Monday, 3 October 2011

Self Defence


VITAL TARGETS
The body is divided into three sections: high, middle, and low. Each
section contains vital targets. The effects of
striking these targets follow:

a. High Section. The high section includes the head and neck; it is the most dangerous target area.

(1) Top of the head. The skull is weak where the frontal cranial bones join. A forceful strike causes trauma to the cranial cavity, resulting in unconsciousness and hemorrhage. A severe strike can result in death.

(2) Forehead. A forceful blow can cause whiplash; a severe blow can cause cerebral hemorrhage and death.

(3) Temple. The bones of the skull are weak at the temple, and an artery and large nerve lie close to the skin. A powerful strike can cause unconsciousness and brain concussion. If the artery is severed, the resulting massive hemorrhage compresses the brain, causing coma and or death.

(4) Eyes. A slight jab in the eyes causes uncontrol lable watering and blurred vision. A forceful jab or poke can cause temporary blindness, or the eyes can be gouged out. Death can result if the fingers penetrate through the thin bone behind the eyes and into the brain.

(5) Ears. A strike to the ear with cupped hands can rupture the eardrum and may cause a brain concussion.


(6) Nose. Any blow can easily break the thin bones of the nose, causing extreme pain and eye watering.

(7) Under the nose. A blow to the nerve center, which is close to the surface under the nose, can cause great pain and watery eyes.

(8) Jaw. A blow to the jaw can break or dislocate it. If the facial nerve is pinched against the lower jaw, one side of the face will be paralyzed.

(9) Chin. A blow to the chin can cause paralysis, mild concussion, and unconsciousness. The jawbone acts as a lever that can transmit the force of a blow to the back of the brain where the cardiac and respiratory mechan isms are controlled.

(10) Back of ears and base of skull. A moderate blow to the back of the ears or the base of the skull can cause unconsciousness by the jarring effect on the back of the brain. However, a powerful blow can cause a concussion or brain hemorrhage and death.

(11) Throat. A powerful blow to the front of the throat can cause death by crushing the windpipe. A forceful blow causes extreme pain and gagging or vomiting.

(12) Side of neck. A sharp blow to the side of the neck causes unconsciousness by shock to the carotid artery, jugular vein, and vagus nerve. For maximum effect, the blow should be focused below and slightly in front of the ear. A less powerful blow causes involuntary muscle spasms and intense pain. The side of the neck is one of the best targets to use to drop an opponent immediately or to disable him temporarily to finish him later.

(13) Back of neck. A powerful blow to the back of one's neck can cause whiplash, concussion, or even a broken neck and death.
b. Middle Section.

The middle section extends from the shoulders to the area just above the hips. Most blows to vital points in this region are not fatal but can have serious, long-term complications that range from trauma to internal organs to spinal cord injuries.

(1) Front of shoulder muscle. A large bundle of nerves passes in front of the shoulder joint. A forceful blow causes extreme pain and can make the whole arm ineffective if the nerves are struck just right.

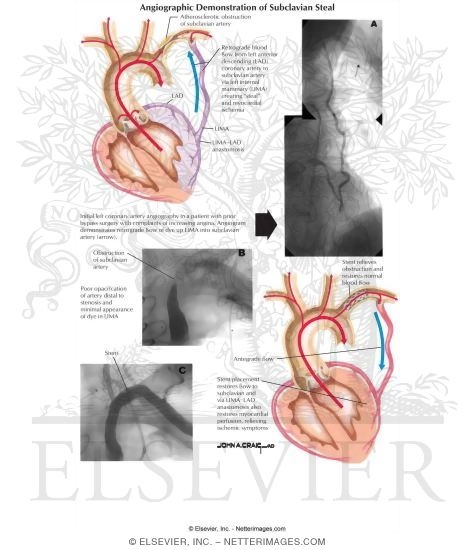
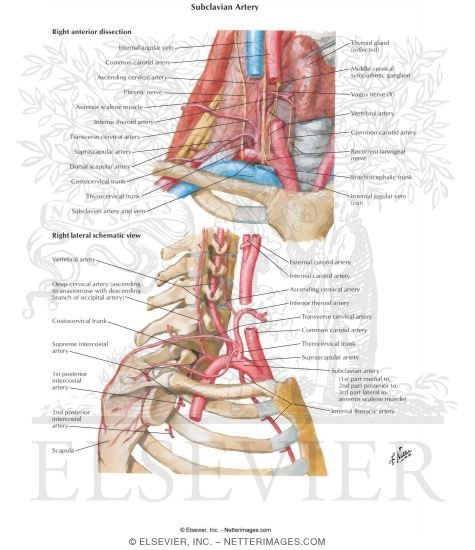
(2) Collarbone. A blow to the collarbone can fracture it, causing intense pain and rendering the arm on the side of the fracture ineffective. The fracture can also sever the brachial nerve or subclavian artery.

(3) Armpit. A large nerve lies close to the skin in each armpit. A blow to this nerve causes severe pain and partial paralysis. A knife inserted into the armpit is fatal as it severs a major artery leading from the heart.

(4) S pine. A blow to the spinal column can sever the spinal cord, resulting in paralysis or in death.


(5) Nipples. A large network of nerves passes near the skin at the nipples. A blow here can cause extreme pain and hemorrhage to the many blood vessels beneath.

(6) Heart. A jolting blow to the heart can stun the opponent and allow time for follow-up or finishing techniques.

(7) Solar plexus. The solar plexus is a center for nerves that control the cardiorespiratory system. A blow to this location is painful and can take the
breath from the opponent. A powerful blow causes unconsciousness by shock to the nerve center. A penetrating blow can also damage internal organs.

(8) Diaphragm. A blow to the lower front of the ribs can cause the diaphragm and the other muscles that control breathing to relax. This causes loss of breath and can result in unconsciousness due to respiratory failure.

(9) Floating ribs. A blow to the floating ribs can easily fracture them because they are not attached to the rib cage. Fractured ribs on the right side can cause internal injury to the liver; fractured ribs on either side can possibly puncture or collapse a lung.

(10) Kidneys. A powerful blow to the kidneys can induce shock and can possibly cause internal injury to these organs. A stab to the kidneys induces instant shock and can cause death from severe internal bleeding.

(11) Abdomen below navel. A powerful blow to the area below the navel and above the groin can cause shock, unconsciousness, and internal bleeding.

(12) Biceps. A strike to the biceps is most painful and renders the arm ineffective. The biceps is an especially good target when an opponent holds a weapon.

(13) Forearm muscle. The radial nerve, which controls much of the movement in the hand, passes over the forearm bone just below the elbow. A strike to the radial nerve renders the hand and arm ineffective. An opponent can be disarmed by a strike to the forearm; if the strike is powerful enough, he can be knocked unconscious.

(14) Back of hand. The backs of the hands are sensitive. Since the nerves pass over the bones in the hand, a strike to this area is intensely painful. The small bones on the back of the hand are easily broken and such a strike can also render the hand ineffective.

c. Low Section

The low section of the body includes everything from the groin area to the feet. Strikes to these areas are seldom fatal, but they can be incapacitating.


(1) Groin. A moderate blow to the groin can incapacitate an opponent and cause intense pain. A powerful blow can result in unconsciousness and shock.

(2) Outside of thigh. A large nerve passes near the surface on the outside of the thigh about four finger-widths above the knee. A powerful strike to this region can render the entire leg inef fective, causing an opponent to drop. This target is especially suitable for knee strikes and shin kicks.

(3) Inside of thigh. A large nerve passes over the bone about in the middle of the inner thigh. A blow to this area also incapacitates the leg and can cause the opponent to drop. Knee strikes and heel kicks are the weapons of choice for this target.

(4) Hamstring. A severe strike to the hamstring can cause muscle spasms and inhibit mobility. If the hamstring is cut, the leg is useless.

(5) Knee. Because the knee is a major supporting structure of the body, damage to this joint is especially detrimental to an opponent. The knee is easily dislocated when struck at an opposing angle to the joint's normal range of motion, especially when it is bearing the opponent's weight. The knee can be dislocated or hyperextended by kicks and strikes with the entire body.

(6) Calf. A powerful blow to the top of the calf causes painful muscle sp asms and also inhibits mobility.

(7) Shin. A moderate blow to the shin produces great pain, especially a blow with a hard object. A powerful blow can possibly fracture the bone that supports most of the body weight.

(8) Achilles tendon. A powerful strike to the Achilles tendon on the back of the heel can cause ankle sprain and dislocation of the foot. If the tendon is torn, the opponent is incapacitated. The Achilles tendon is a good target to cut with a knife.

(9) Ankle. A blow to the ankle causes pain; if a forceful blow is delivered, the ankle can be sprained or broken.

(10) Instep. The small bones on the top of the foot are easily broken. A
strike here will hinder the opponent's mobility.

Sunday, 2 October 2011

Types of Arterial system


Here are different types of arterial system of human body.

Pulmonary arteries Systemic arteries The Aorta Arterioles Arterioles and blood pressure 6. Capillaries Functions Now we will see the functions of these parts of arterial system in detail.

Pulmonary arteries

It is a large artery which comes from the superior surface of right ventricle and it carries the deoxygenated blood from the heart to the lungs. It has a unique property that it has exception from the rule that the arteries contain oxygenated blood from the heart to the all remaining parts of body. It exchanges the carbon dioxide with oxygen in lungs.

Systemic arteries

Systemic arteries are an important part of arterial system which can be subdivided into 2 types. Muscular Arteries Elastic Arteries In their tunica media, according to their relative compositions of elastic and muscular arteries, as well as their size and the makeup of internal and external elastic lamina, the large arteries are elastic while small arteries are muscular. These systematic arteries provide blood to the arterioles and after that provides blood to capillaries where nutrients and gases are exchanged.

The Aorta

It is the largest artery of the body. It arises from the left ventricle of the heart and goes up a little. After arising it bends over then it descends through 2 parts of the body, Chest and Abdomen and where it ends it divides into 2 arteries which are called Common Iliac Arteries These iliac arteries then go towards the legs. Traditionally the aorta is divided into the ascending aorta and descending aorta. The descending aorta then divides into thoracic aorta and the abdominal aorta. The very first branches of aorta are coronary arteries which supply blood to the heart muscles. After that come the brachiocephalic artery, the left common carotid and the left subclavian arteries.

Arterioles

These are the smallest part of arteries which by the contraction of smooth muscles of their walls, help to regulate the blood pressure. The arterioles also provide blood to the capillaries.

Arterioles and blood pressure

When arteries go towards the other parts of body from the heart they get smaller. When they reach at one point by decreasing in size they are called arterioles. Theses are strong and have relatively thick walls in size. These contain a high percentage of smooth muscles. These are very important because as a group they are the most regulated blood vessels in the body. They mostly overall contribute in blood pressure. When blood flow speed up and speed down these constantly changes their size. Capillaries It is located within the tissues of the body which transport blood from arteries to the veins and extremely small body vessel. Capillaries play very significant role in microcirculation. Microcirculation is a process in which blood is transferred from heart to arteries, smaller arteries, capillaries, venules, veins and then back to heart. Works of capillaries 1. In the kidneys, wastes are released to be eliminated from the body. 2. In the tissues, oxygen and carbon dioxide and nutrients and wastes are exchanged. 3. In the lungs, carbon dioxide is exchanged for oxygen. 4. In the intestine, nutrients are picked up, and wastes released.

www.arterialsystem.com


Settle On Which Primary Code This Case Suggests: +33225


Start by analyzing the report excerpt

An incision was made along the left deltopectoral groove, and an ICD pocket was dissected out, was geared up with extensive dissection.

Three different guidewires were advanced into the left subclavian vein using the Seldinger technique across the open pocket. The middle of these wires were then used to further a coronary sinus sheath for placement of the left ventricular lead. With some complexity, we were in the end able to advance the coronary sinus sheath in the mid coronary sinus and an angiogram was obtained. After this a left ventricular lead was advanced in the lateral cardiac vein and the tip was advanced to the near LV apex. Electrical testing was done at three separate locations and the rest of these noted a lead impedance of 840 ohms and an R wave value of 17.1 mV.

After this, the bipolar right ventricular defibrillator active fixation lead was advanced to the right ve ntricle, various areas were checked and the lead was lastly fixated along the RV.

Next the bipolar right ventricular defibrillator active fixation lead was advanced to the right atrium. Various areas checked and the lead was in the end fixated along the RV septum and tested.

Post this, a bipolar screw in type right atrial lead was advanced to the right atrium and the lead was fixated to the right atrial wall. Then the coronary sinus sheath was removed with the cutting device maintaining a good lead position of the LV lead.

All three leads were then sutured to the pectoral fascia over the Silastic sleeves; the pocket was then irrigated. Pretty soon the leads were attached to the ICD/BiV device. Then the ICD was placed in the pacer pocket after a standard dose of thrombin material in the pocket. Pocket was then sutured closed.
The patient was given propofol and the following establishment of adequate general anesthesia. Ventricular fibrillation was induced; the advice analyzed and delivered three different DC counter shocks, at last at 36V and the patient converted back to normal sinus rhythm. Patient was awakened from sedation minus obvious side effects.

Find your first stop at an add-on code

The case study appears to be a new implant of a Biventricular Defibrillator with follow-up testing at implant.

While making your way through the first two paragraphs, you should train eyes on the terms describing placement of the left ventricular lead through the coronary sinus. The proper code for this portion is +33225.

Documentation tip: You may see this lead referred to as either a left ventricular (LV) lead or coronary sinus lead.

Add the primary code for that add-on code

The next few par agraphs of the documentation describe lead fixation for the right ventricle (RV) and the right atrium (RA). Also the cardiologist attaches the leads to the device, places the device in the pacer pocket, and sutures the pocket closed. All of this is covered by one code: 33249.

Add-on note: CPT code lists 33249 as a proper primary code for add-on code +33225. Remember that add-on' codes are always carried out in addition to the primary service or procedure and must never be reported as a stand-alone code.

Defib testing earns the final code

The last paragraph of the case study excerpt describes 93641. With defib testing, you want to see impedance in the documentation. Generally physicians will state something like Ventricular fibrillation was induced. The device analyzed and delivered 3 separate DC countershocks, at last at 36V and the patient converted back to normal sinus rhythm. The high-voltage impedanc e was 45 ohms.

Term tip: The defibrillation threshold (DFT) is the minimum energy amount required during ventricular arrhythmia to defibrillate the heart reliably. Knowing the patient's DFT aids the cardiologist confirm that the cardioverter-defibrillator (ICD) programming will provide enough of a surprise to defibrillate the patient's heart.

Ensure your practice hits these points

In a situation like this, the doctor would typically use fluoroscopy, as well; however, it is not documented in this case.

No documentation of fluoroscopy means you should not bill fluoroscopy. When fluoroscopy is documented, you should go for 71090-26.

ICD-9: What's more, the case study does not mention indications for you to select ICD-9 diagnosis codes. Minus a VT [ventricular tachycardia] diagnosis or information relating to primary prevention criteria, this cannot be coded. Either you have to ha ve a payable diagnosis for the ICD or data to support adding a Q0 modifier to 33249.

What's more, check your local requirements for diagnosis codes that support medical necessity for 33225.


Bilateral Neck Dissection with Thyroidectomy Claims


Otolaryngology coding can spring a lot of surprises for you. To cite an instance, let's say your surgeon plans to carry out a bilateral neck dissection with thyroidectomyand trachea resection however ends up having to also perform plate stabilization for access to the lymph nodes in the superior mediastinum. You can overcome this challenge with a thorough review of the documentation and careful use of modifiers.

If you need further proof, take into consideration the following op report. After you review the op note, code the procedure prior to checking out our expert advice below.

Preoperative diagnosis: Medullary carcinoma of the right lobe of the thyroid, stage T4-A, N1-B, M0.

Procedure overview: One more ENT previously started a total thyroidectomy on this patient; however that the cancer was eroding into the trachea; as such he referred the patient to this surgeon. The new surgeon carried out a right modified radical neck dissection with preservation of the spinal accessory nerve and sternocleidomastoid muscle, as well as a left selective neck dissection, removing the lymph node levels II through IV. He also carried out a right thyroidectomy, a resection of the right lateral trachea, and osteotomy of the right clavicle with plate stabilization for access to lymph nodes in the superior mediastinum.
Op Note: Trace the surgeon's work

The relevant details of the op report: We carried out a modified radical neck dissection on the right neck, with preservation of the spinal accessory nerve and sternocleidomastoid muscle. We figured out that the internal jugular vein was involved by disease at level IV, and as such sacrificed the internal jugular vein along with the rest of the neck contents. As we tracked the disease near the phrenic nerve, we saw that the disease was tracking down into the superior mediastinum and possibly involved the right subclavian vein.

In order to offer better exposure to the vasculature in the superior mediastinum, we fractured the clavicle using a Gigli saw. We removed the lymph nodes that were tracking down along the carotid artery and jugular vein. Then we carried out a left neck dissection, removing lymph node levels II, III and IV.

We separated the fascia from the deep surfaces of the sternocleidomas toid muscle, which allowed us to remove the lymph node tissue from levels II, III and IV, thus bringing it anteriorly across the great vessels. As soon as we had it into the anterior aspect of temperature neck, we terminated the specimen and sent it to pathology.

For the entire article and further details on bilateral neck dissection with thyroidectomyand trachea resection, sign up for a one-stop medical coding guide like Supercoder.


Saturday, 1 October 2011

Ensuring Proper Infection Prevention Techniques With A Needleless IV Port


Ensuring Proper Infection Prevention Techniques With A Needleless IV Port

Preventing infection of needleless IV ports could save 30,000 lives a year. According to the Center for Disease Control, that is the number of annual patient deaths from catheter related bloodstream infections. Employing infection prevention techniques becomes paramount to prevent unnecessary patient mortality. So what how are patients protected?

Needleless IV ports are most commonly inserted when patients will be undergoing a continuous infusion regimen such as chemotherapy. Thus, a potential infection may occur each time the port is accessed to administer treatment. Infection prevention requires careful disinfection of the port following each use. Rigorous Best Practices protocols have been implemented nationwide to support a zero tolerance policy on catheter related bloodstream infections.
When inserting the needleless IV port, the infusion nurse is required to maximize a sterile barrier by using a surgical mask and gloves, and sterile drapes. To reduce infection risk the catheter should be placed in a subclavian vein instead of a femoral vein. And the needleless IV ports and dressings should only be changed out if absolutely necessary.

When utilizing a needleless IV port for patient treatment, the infusion nurse must disinfect the port prior to accessing it. The port connector must also be allowed to dry completely.

All of these measures rely on individual compliance and proper technique infection protection.

Now there are several devices clinicians can use to disinfect and protect needleless IV ports that reduce patient infection risk. These port protection devices contain a spongy center or foam pad that is saturated with a disinfectant solution. When secured onto the port, the device is compressed so that the treated sponge disperses the disinfectant, thoroughly cleansing the needleless IV port. The device remains attached to the port until the next treatment administration. Between treatments, patients benefit from added infection protection against airborne pathogens. In a white paper published by St. Francis Hospital of Columbus, Georgia, using a disinfecting device over manual disinfection procedures reduced bloodstream infection occurrences by 56 percent.

Needleless IV port protection devices offer consistent patient infection protection and provide hospitals with better compliance control for reducing catheter related bloodstream infection.


Portacath Placement


Portacath catheter, also known as a port is an appliance that is installed under the skin. It comprises of a septum where different drugs are injected and a catheter that enters the vein. This allows doctors to draw blood samples as often as it is necessary and makes it easier for different medical substances to be injected into the patient's body. With the portacath catheter the discomfort for the patient is reduced because of the fact that their skin is not punctured tens of times a day. The portacath chamber has a silicon cap on top of it. This cap allows hundreds of punctures and after each puncture it seals itself. By doing this it both prevents bacteria from coming in and allows many injections to be done without removing the first catheter.

For every specialist it would be a child's game to place the portacath properly. The doctor has to find the subclavian vein which is just below the clavicle bone. It is easily found by a trained specialist. The needle should slide on the lower part of the bone and that would ensure that the doctor would not miss the vein. What's more, the procedure is done under the supervision of a monitor that guides the doctor. The syringe has to fill with a little blood. This is a result of the blood pressure and indicates that the doctor hasn't missed the vein and has placed the catheter in the right place. Later, a small incision is made a little lower on the chest. The portacath chamber is installed under the skin. Then it is important to clear the whole system with heparin. This is a chemical substance that prevents clots from forming. Both incisions are put stitches in then and the whole procedure of the portacath placement is over.

When you want to have the catheter removed the surgery is even easier. All the surgeon has to do is reopen the two wounds, remove the catheter and the portacath chamber and put stitches in the wounds again. What's important is that you should not forget about the port and neglect it. If you do so it may get blocked by clots and it may cause major problems for you. So, visiting your doctor once a week would prevent you from having any problems.

The whole manipulation can be described as routine and there are very little risks concerning it.

Infections are really rare because the main purpose of this method is to avoid different infections by avoiding a lot of punctures to the skin. This appliance can stay under the patient's skin for quite a lot of time and it doesn't need changing but only cleaning with heparin.

Complications are not totally excluded but they appear extremely rarely. What's more, even when they appear they are not at all serious and are very easily treatable. The main purpose of this device is to keep the patient safer and away from infections and to reduce the discomfort for them.


The Physician Job Interview - Essential Tips for Success


Interviewing for physician jobs can be stressful, as your entire candidacy for what may in fact be the ideal job is on the line. Knowing that a good or bad interview can directly affect the job outcome, physicians often worry, and stress out about the interview - and understandably so! In my years as a practicing physician, as well as an administrator, I have learned a few tips I have found successful for me and those who either I have interviewed or know of as successful physicians in ideal jobs. Here are a few of my Tips for success:

1. I don't know! - yes, for those perfectionists I am going to say it again - I don't know! Seriously, physicians have much trouble with these words. However, the successful physician job seeker knows the value in being prepared to say them. It's okay, though - really! In fact, comfortableness with these words will foster more strength and self-confidence. Additionally, self-confidence will not only allow you to rest easily before the interview, it will radiate from you during the interview, and significantly enhance your visit. As an example, for those medicine and surgery folks that have ever put in a subclavian central line, the saying is "the only doctor who has not dropped a lung (caused a pneumothorax) is the one who has not done enough subclavians!" In placing a subclavian central line, there is the chance of creating a pneumo. Knowing and understanding this, and going over what you know about the procedure all help mitigate your anxiety preemptively. This is im portant when coping in the unfortunate event of actually creating an iatrogenic pneumothorax. Moreover, know that a pneumothorax can and will happen at some point even for the best, will instill confidence before, during, and after the procedure. This will allow you to better prepare and focus on cannulating that vein successfully, rather than anxiously, and cautiously worrying about a complication that is statistically inevitable.

The interview is the same. Know that you are going to get a question that may stump you, or cause you to stumble. Interviewers often have their one favorite tough question meant to stump you to see your response. Most physician interviewers though, greatly appreciate a physician candidate's honesty in an answer . . . the doctor that says "wow, that's a good question . . . I don't know" and then who later follows with "I would probably, etc..." This is a very good response to a tough question. The honest disclaimer is thrown out there and somewhat protects you from whatever answer you then provide. Much like the defensive flag thrown in football after the snap - it is basically a free pass and free down for the offense. This type of upfront openness and honesty will serve you well during the interview. Alternatively, if you force, fake, lie, or develop erratic behavior upon receipt of a tough question, it is likely that your actions will compromise your perceived integrity, an d damage your chance of getting the job. Again, be comfortable and confident in what you know; likewise, it is okay to admit that you do not know - it is actually preferred. Let this sink in, believe and understand it. This will drastically reduce your anxiety, enable you to perform better during the interview, and allow you to present yourself as an intelligent, knowing, and honest physician candidate!

2. Presentation - judgment is quickly passed, and the dinner just about ruined when the thanksgiving turkey that is un shaven, smells, has the garnishments mismatched and thrown everywhere, that is rushed to the table late, and sizzling as if it just came out of the oven, while the cook is tucking in the foil! Well, neither do physician interviewers. Unlike responding to ER call let's say at 3:30 am, it is not okay to show up at an interview disheveled. It is imperative that the interviewee is clean, punctual, and sharp. If you have to drive hours to arrive at your interview, bring a change of clothes just to be fresh. Try to avoid the jacket with countless wrinkles, etc., unless you are prepared to wear a sign on your back asking everyone to excuse you, because you had to drive 2 hours! Now there is no need to by the Armani suit with gold cufflinks. Any suit is fine it's just that it has to be conservative, professional, clean, and pressed. Avoid having interviews on vacation with family where you are just passing through, and decided to check out an opportunity. Unless you have your interview suit, I would wait until you can return. First impressions matter, much like the thanksgiving turkey! And oh by the way, just as there is now room for excessive garlic, clove, or cumin on the turkey, it goes without saying, excessive perfumes and colognes are unacceptable, unless you know exactly what cologne or perfume your interviewer likes. In that case, spray away! If not, do not risk completely distracting or turning an interviewer off because of your strong, offensive, perfume! On the other hand, breath mints can save embarrassing post-prandial halitosis. They can even give you a lift during a long boring interview. Carry a few in your pocket.
3. Enthusiastic Engagement - you will never know the number of non-doctor personnel that hold great influence on your successful candidacy for a position. For example, the secretary and administrative assistant to the Program Chairman of 30 years; or the Directors housekeeper nicknamed "Ma"; or the security officer at the parking lot who son had the . . . etc., etc. Bottom line here is treat everyone with enthusiasm, excitement, and engagement. Look everyone in the eye, warmly shake their hand, and don't rush to look away or else risk appearing superficial or dismissive. Talk with them, ask questions to get them to talk about their hospital, or practice which they love.

As for the interviewer, show interest. Be observant to the pictures in the office, awards, objects, and ask questions. Likewise, while walking through the practice setting, do the same. You should have also done the necessary online research to learn about the interviewer and group. You must ask the appropriate questions for these will cause the interviewer to proudly talk about their accomplishments, achievements, or special interests - and everyone loves to themselves in a show and tell manner . . . even interviewers!. In doing so, you will be liked because you will appear to have similar interests, or at least an appreciation and awareness of the interviewers most proud and enjoyable memories - and you will be remembered.

Posture and positioning are both essential, and worth mention here. It is a delicate balance between respect and rigidness. Finesse must be both practiced and exercised here in order to do this properly. As an example, imagine the military officer on base. There is a time to be rigid, formal, and upright, and yet there is time and place to be at ease. On the interview, walk briskly, assertively, firm handshakes, sit upright (and not laid back legs spread) until you know it is time to do otherwise. If you are being 'cross examined' and the interviewer is walking or pacing around the room so to speak, remain upright. If the interview is in the medical staff lounge, and the interviewer takes off his lab coat, leans back on a sofa, it's time for you to do the same. All the while, maintain your enthusiastic engagement, and you will succeed.

4. Mind Your Manners - this tends to tie in with the aforementioned sections, but it deserves separate mention because so many of us doctors feel that we are above reproach. Yes we are good, yes we are the best in what we do, yes we save lives, but also, yes we all have mothers who will slap our hands and wash our mouths our with soap for misbehaving! So mind your manners on the interview - even if you don't in your daily life! Ladies first, opening doors and waiting for the trailing person to pass, not interrupting someone else talking are key. This may seem basic, but trust me, over the years, you would not believe the number of physician candidates I have encountered who didn't understand this. One does not have to be ridiculously excessive, but appropriate is ideal. Although I was never in the military, I must mention it here again. Think of the soldier in uniform . . . everyone just loves their demeanor, manners, courtesy and appropriateness. On your interview, be have like that soldier. Everyone will like you just the same as the solider. Moreover, this too will aid in attaining the best physician job.

5. Stories and Anecdotes - are often entertaining, and allow you to leave lasting impressions. When answering a question about you, your reasons for moving to this city, or joining the practice - tell a story. Importantly of course, is that you must directly answer the question. However, adding a descriptive, brief story allows for your creative, engaging, jovial, side to appear. Note that you should only do this only a few times during the interview. An excessive amount of storytelling or anecdotes will distract from the interview. You don't want to have more stories to tell than the interviewer! The other benefit to stories and anecdotes for the savvy and wise physician interviewee, it allows you to smoothly transition onto an attribute that you are waiting and hoping to discuss. For example, if you have applying for an infectious disease position, and as a child spent years in South America with your family in the military - when asked "what are your strong attribut es?" consider this reply: My strong attributes in my work ethic arise from my father's military background. For many years we lived in various countries during my childhood, in South America, Latin America, etc." This should then trigger the next question from the infectious disease chairman to be one that excitedly and curiously delves into the infectious disease experiences in South America. Smoothness, and timing are key, so be on the lookout for the right time.

6. The Minor Details - cumulatively are worthy of their own section. These are important aspects of preparation and execution that help make your interview complete:

a. Bring extra, clean and unblemished copies of your CV or resume

b. NEVER bring up salary or remuneration unless directly asked of you.

c. Do not arrive on time to the interview -ARRIVE EARLY!

d. Obtain business cards at the end - useful for thank you cards later

e. Eat light when dining with interviewer, and avoid alcohol

f. Express gratitude and thanks for the interview